Introduction
Interior design is a creative expression of your personality and style, transforming a house into a home. One of the most popular trends in modern interior design is the use of stone veneer to add a touch of elegance and rustic charm to living spaces. Stone veneer is a versatile and cost-effective way to enhance your interior, creating a timeless and sophisticated atmosphere. In this guide, we will explore the various ways you can use stone veneer in your home as a DIY project, offering practical tips and creative ideas to elevate your interior design.
I. Understanding Stone Veneer
Before delving into the DIY projects, it’s essential to understand what stone veneer is. Stone veneer is a thin layer of natural or manufactured stone that is applied to surfaces, providing the appearance of a solid stone wall. It is lightweight, durable, and comes in a variety of textures and colors, making it suitable for various interior applications. Whether you prefer the rustic appeal of stacked stones or the sleek look of smooth surfaces, stone veneer can cater to your design preferences.
II. Choosing the Right Type of Stone Veneer
When selecting stone veneer for your interior design project, consider factors such as the style of your home, the desired ambiance, and your budget. Natural stone veneer offers an authentic and unique appearance, showcasing the natural beauty of stones like slate, granite, or limestone. On the other hand, manufactured stone veneer is more affordable and offers a wide range of options, replicating the look of natural stones.
III. DIY Stone Veneer Installation: Step-by-Step Guide
- Gather Necessary Tools and Materials:
- Stone veneer panels or pieces
- Mortar mix
- Metal lath
- Trowel
- Level
- Wet saw (for cutting stones)
- Grout bag
- Sealer (optional)
- Prepare the Surface:
- Clean the surface thoroughly to remove dirt, dust, and grease.
- Apply a layer of metal lath and secure it with screws, providing a stable base for the mortar and stones.
- Mix and Apply Mortar:
- Prepare the mortar mix according to the manufacturer’s instructions.
- Use a trowel to apply a thin layer of mortar to the metal lath, creating a rough surface for the stones to adhere to.
- Arrange and Install Stones:
- Plan the layout of the stones, ensuring a balanced distribution of colors and textures.
- Press the stone veneer pieces firmly into the mortar, starting from the bottom and working your way up.
- Use a level to ensure the stones are straight and properly aligned.
- Grouting and Sealing:
- Fill the gaps between the stones with mortar using a grout bag, ensuring a uniform and neat appearance.
- Allow the mortar to set for a specified time before cleaning off any excess with a damp sponge.
- Optionally, apply a sealer to protect the stone veneer and enhance its longevity.
IV. Creative DIY Projects Using Stone Veneer
- Accent Walls:
- Create a focal point in your living room or bedroom by covering one wall with stone veneer. This dramatic feature adds depth and character to the room.
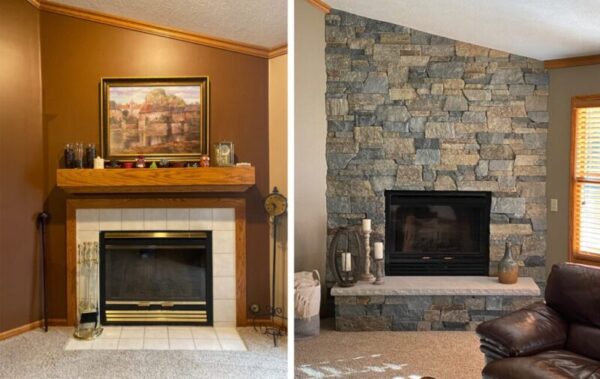
- Fireplace Surround:
- Transform your plain fireplace into a stunning centerpiece by applying stone veneer around the mantel. Choose contrasting colors to make the fireplace visually appealing.
- Kitchen Backsplash:
- Upgrade your kitchen by adding a stone veneer backsplash. This not only protects your walls from splatters but also adds a touch of sophistication to the cooking area.
- Bar or Island Facade:
- Enhance your home bar or kitchen island by covering the facade with stone veneer. This creates a rustic, pub-like atmosphere and makes these areas visually appealing.
- Archways and Pillars:
- Use stone veneer to cover archways or pillars, giving your home an elegant and timeless look. The natural texture of the stones adds depth and warmth to any space.
- Bathroom Accents:
- Apply stone veneer to bathroom walls, particularly around the bathtub or shower area. The water-resistant nature of stone veneer makes it an excellent choice for bathrooms, adding a touch of luxury to your space.
V. Maintenance and Care
Stone veneer, whether natural or manufactured, requires minimal maintenance to preserve its beauty over the years. Here are some tips to ensure the longevity of your stone veneer:
- Regular Cleaning: Wipe the surface with a damp cloth to remove dust and dirt. Avoid abrasive cleaners, as they can damage the stones.
- Sealing: If your stone veneer is located in areas prone to moisture, consider applying a sealer periodically to protect it from water damage.
- Avoid Harsh Chemicals: Refrain from using harsh chemicals or acidic cleaners, as they can erode the stone’s surface and alter its appearance.
- Inspect for Damage: Periodically check the stone veneer for signs of damage, such as cracks or loose pieces. Repair any issues promptly to prevent further damage.
Conclusion
Embracing the trend of stone veneer in your interior design projects can significantly enhance the aesthetic appeal of your home. By understanding the types of stone veneer available, mastering the DIY installation process, and exploring creative project ideas, you can transform your living spaces into elegant and inviting environments. Remember to choose the right type of stone veneer, plan your projects thoughtfully, and invest in proper maintenance to enjoy the timeless beauty of stone in your home for years to come. So, roll up your sleeves, gather your tools, and embark on your journey to enhance your interior design with the rustic charm of stone veneer.